Mandala Mania

 I have to admit I’ve been totally obsessed with Mandalas for ages! Why? I have absolutely no idea! I don’t even remember exactly when my fascination began. Recently I've spent a lot of time drawing Mandalas, coloring them, growing them (that’s a post for another day) and realizing that each one is unique, never to be repeated. It’s crazy fun so Let's learn How to Draw a Mandala with a Compass.
A Mandala is a circular art form – a symbol of unity and wholeness and they appear in every culture and major religion. But there are Mandalas everywhere and I never realized it until I began to pay attention. Some of my favorite everyday Mandalas are kaleidoscopes, compass roses, flowers, stained glass windows, celtic knots, snowflakes, the cross section of a tree trunk or stem, the rings around a stone tossed into water, a crosscut citrus fruit or apple and merry-go-rounds.
One of the easiest Mandalas to create starts with a compass and a piece of white card stock. I have several different compasses, but I have to say this one is my favorite. I love the way I can squeeze the levers to quickly adjust the circle size. Choose a compass, give it a try.
I started with white card stock that I cut into a square. Because my square is 8.5”, I drew a light pencil line 4.25” from each side to find the center point of the circle.
I installed a black Pigma Micron Pen – size 02 in my compass, set the compass slightly smaller than the card stock and drew the circle. Hint: I find that it's easier to draw the circle if I hold the compass and rotate the card stock.
Watch the Part 1 video below to see exactly how I begin creating this Mandala. You'll also see still photos after the video for quick reference.
Draw Pencil Guidelines and Pen Circle

Next, place the compass point where one of the initial guidelines intersect the circle. Start the pen at the circle and swing the arc as far as it will go to the opposite side of the circle. Easy!
Be sure to click on the photos to get a closer look!
Ready to Draw

Draw Arc 1

Draw Arc 2

Now, pick up the compass and place the point at the end of the arc you just drew. Draw the new arc from one side of the circle to the other. Pick up the compass point and place it where the last arc stopped and continue drawing arcs the same way until you have 6 completed petals inside the circle. Isn’t that cool?
Finished Arc 2

Arc 3

Arcs Create Petals!
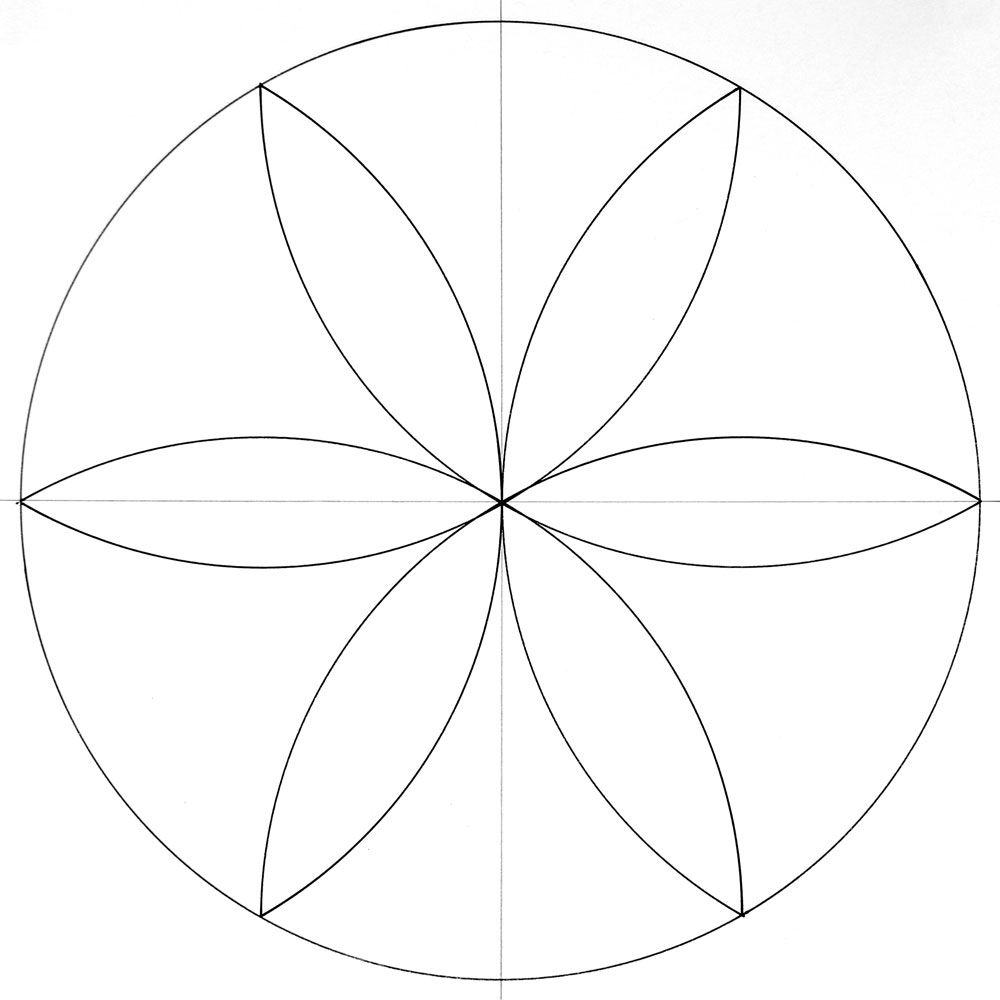
To create the outer rings, set the compass a bit smaller than the original circle size. Place the compass point in the center of the circle and draw a circle, jumping over each petal.
Set the compass to create a smaller circle, and repeat as many times as you wish, to create a series of rings behind the petal shapes.
Or, begin drawing your circles from the center as I showed in the video. Do what is easiest for YOU!
Rings Around the Petals

Lastly, do the same thing to create rings within the petals, making sure that they are different from the outer rings. The created optical illusion is fun, isn't it?!
Inside Petal Rings

Mandala Patterns
Now for even more fun!
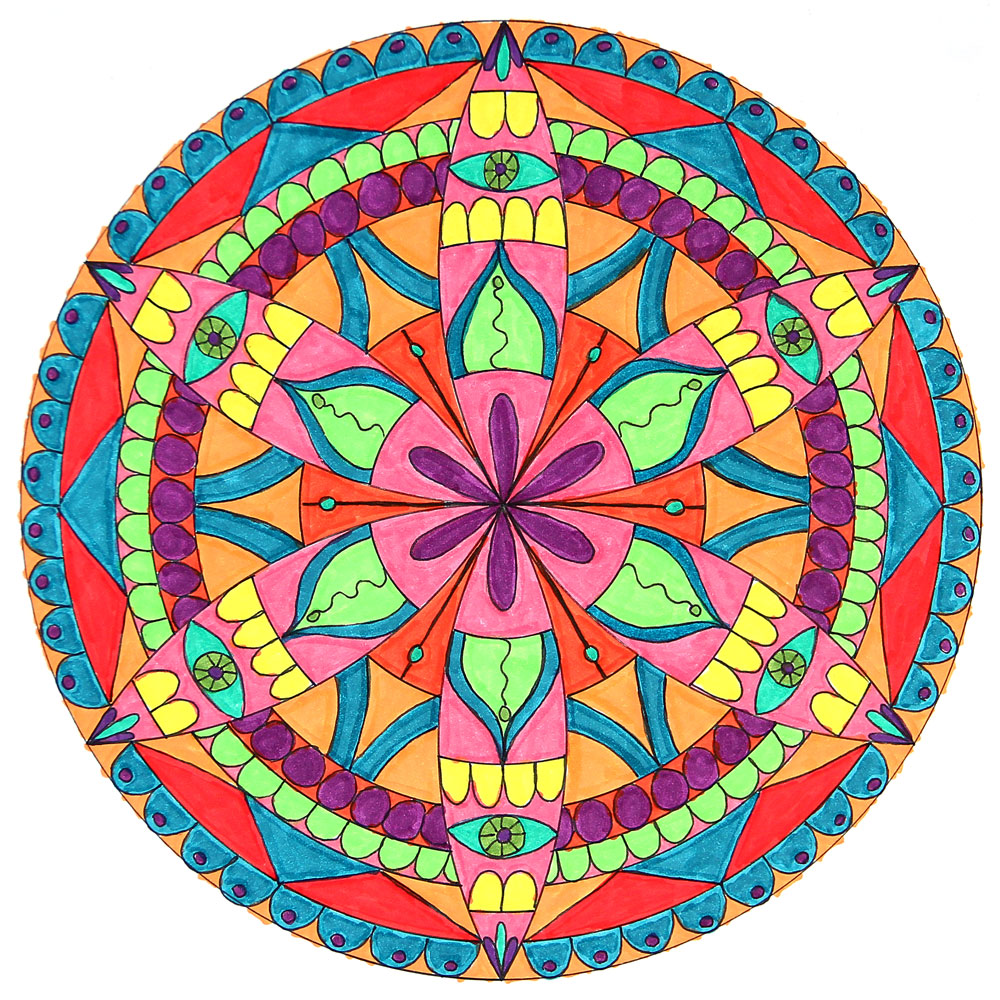
With a pencil, (I like a Mechanical Pencil because of its thin line) create a shape within one petal. Repeat the same shape in each petal. I fill the petals first and then fill the background rings with pattens and doodles. If I need to erase, I like to use a Stick Eraser because it erases cleanly and the small size is good for small corrections, too.

Ink the Mandala
When I’m happy with the patterns, I go over the lines with the same Black Micron Pigma Pen or a Black Gelly Roll pen. Both dry very quickly and are permanent. Once you are sure that the ink is fully dry, erase all pencil lines.
Next, add color. I love Pitt Artist Big Brush Marker Pens and the smaller Pitt Brush Pens, too. The large ones work well for quickly adding color in more open spaces.
Watch the Part 2 video below to see exactly how I added patterns and color to my Mandala.

Color!
Here you can see my colored Mandala. The Pitt Brush Pens are vibrant and wonderful for this Mandala. Be sure to let your inner kid have free reign while you color. No judging allowed! Hint: The petals will show best if their color contrasts with the outer rings.
Next, watch the Part 3 video to see how to “frost” your Mandala. 🙂
Frosting on Mandalas?
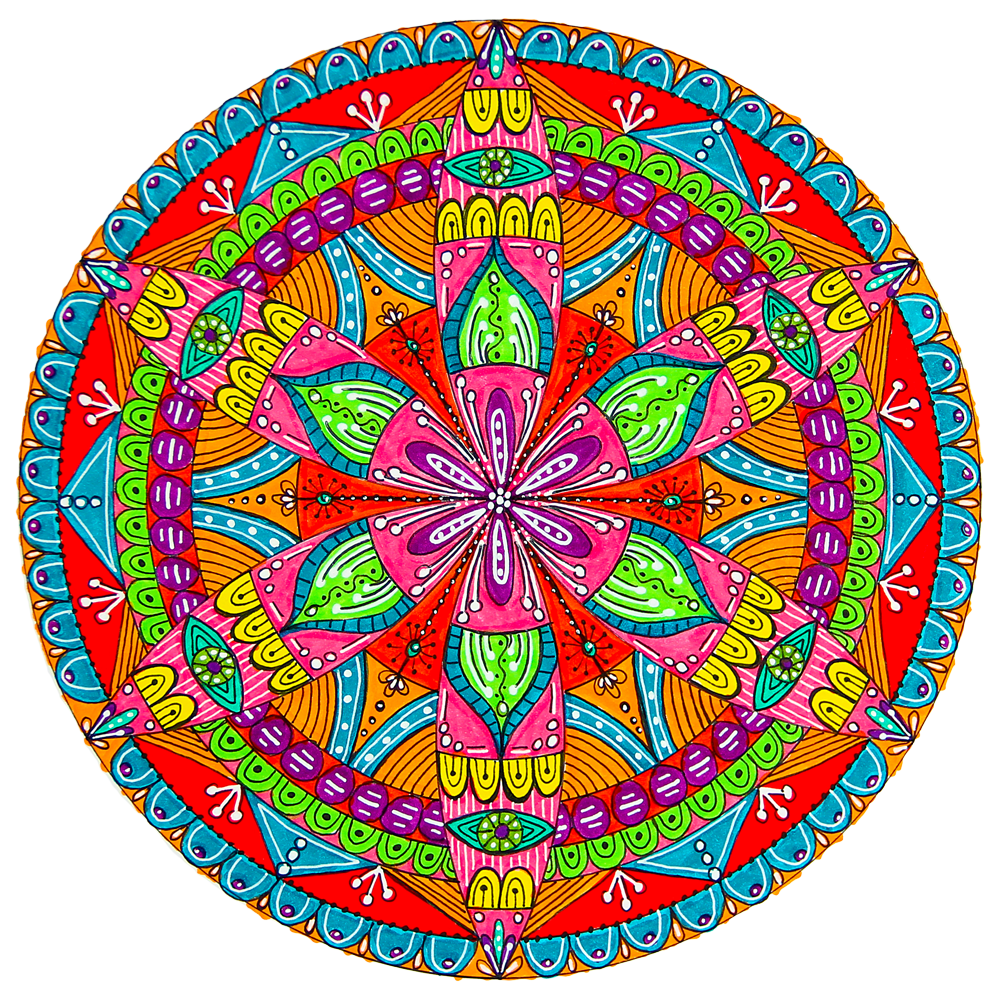
After coloring the Mandala, it's time for “frosting” with a White Uniball Signo Pen or a White Gelly Roll Pen. I also add lots of details with a Black Gelly Roll Pen or a fine Sharpie Black Pen. I love all parts of creating a Mandala, but this is my most favorite – adding all the details. Go as detail-crazy as you like until your Mandala feels complete. If you want the colors to really pop, simply cut out your Mandala and attach it to black cardstock.
Learn More about How to Draw Mandalas
I hope you enjoyed learning how to Draw a Mandala with a Compass.
Check out our course called Mandala Madness where you can learn how to create beautiful artwork with your Mandalas.
Click the image below to find out more.

Printable Mandala eBooks
You might also like to have a look at our Printable eBooks with 60 Done-For-You Mandalas.
NOTE: You can also include ALL these eBooks with the course Mandala Madness with a nice little discount.

eBook
Mandala Madness

eBook
Mandala Medley

